Vaultek Support
MX Series
MXE
Support for MXE
Support for MXE


Get Started
Basic Overview
The Vaultek® MXe part of MX Series is a tough and rugged, quick access safe. Its solid structure and penetration resistant design makes it ideal for storing valuables such as firearms, jewelry, cash, and other personal items. Powered by a rechargeable lithium-ion battery, the safe combines high security with complete access control.
Change the default code as soon as possible to prevent unauthorized access to your safe.
DO NOT place or store the backup keys inside the safe at any time. If the battery fails, you will be unable to open the safe.
DO NOT expose to extreme heat or cold. Battery power may be affected.
DO NOT use a battery which has physical damage such as scratches and dents on the housing. Replace the battery every 3 years.
DO NOT store loaded guns in this unit. Firearms are serious in nature and must be handled with respect. Store responsibly.
Keep this product away from small children as the package contains small items that could become a choking hazard.
Battery Installation
Your safe uses a 3.7V 18650 rechargeable lithium-ion with a flat top. A minimum 2000 mAh capacity is required, however 2200 mAh or higher can be used to increase operation time.
You can also plug in your safe continuously.

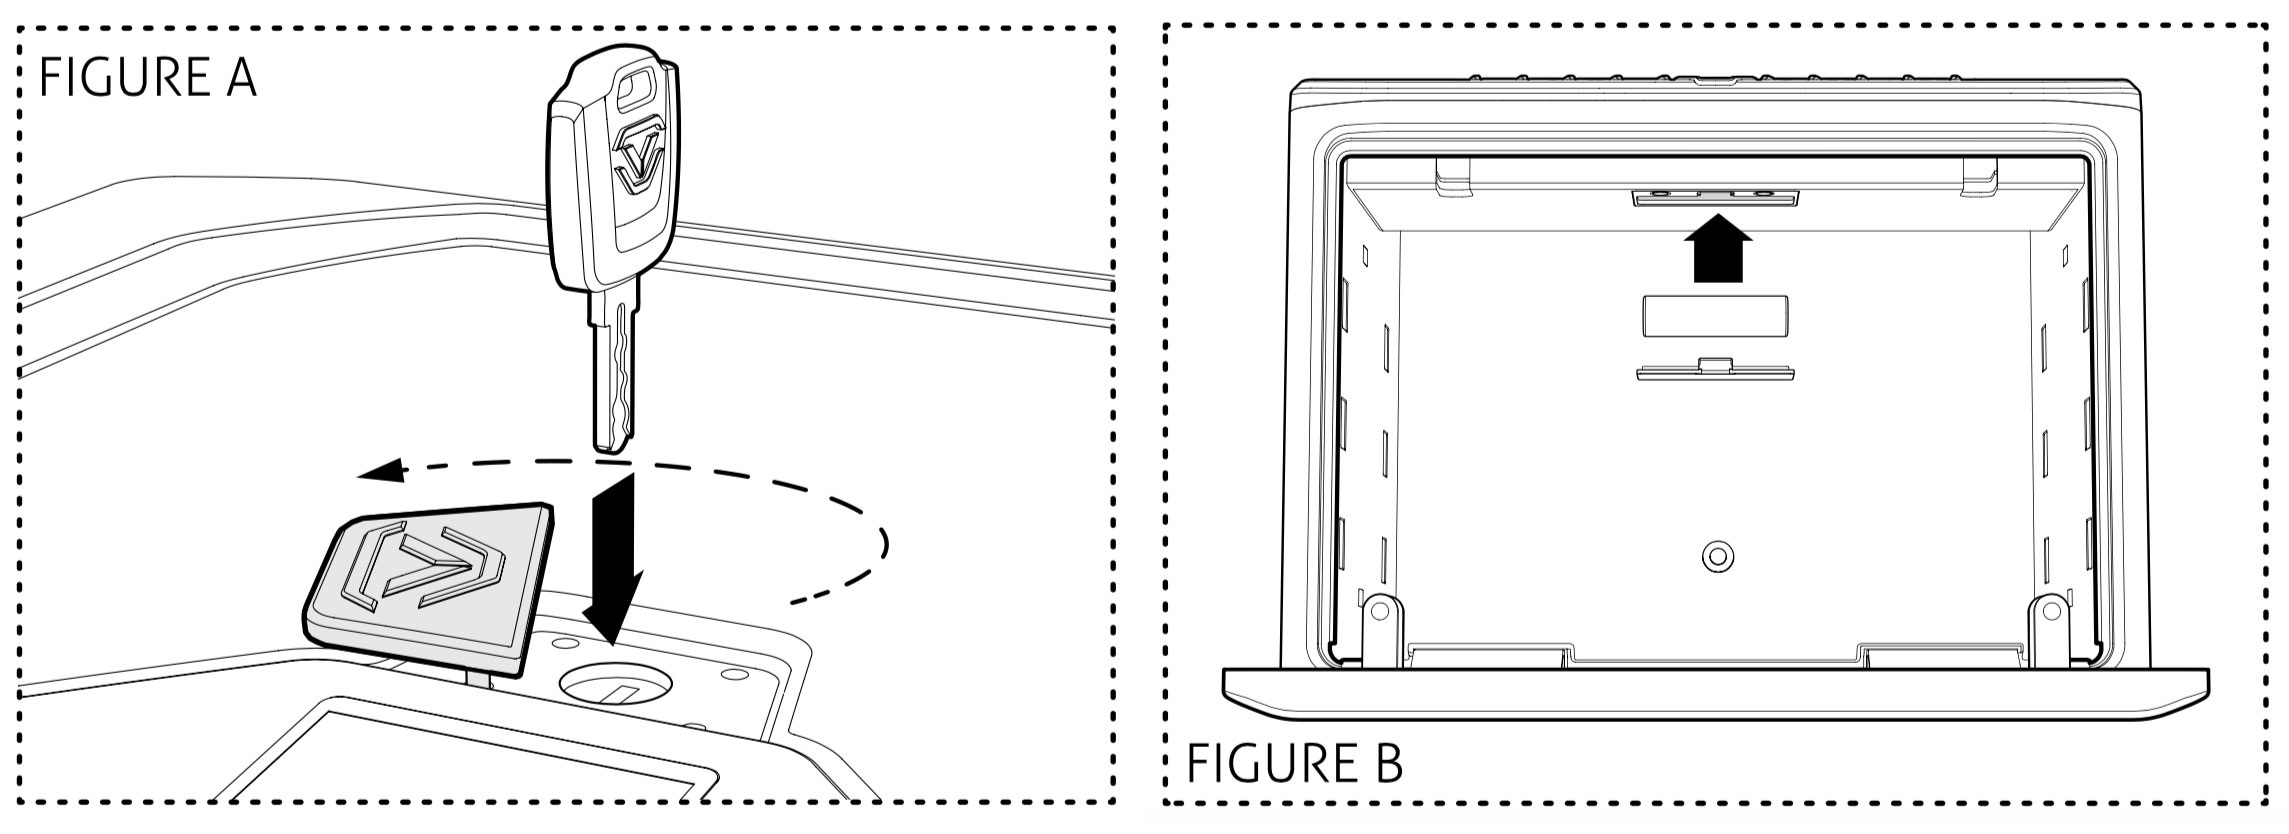
1) To get started, insert one of your backup keys into the keyhole at the top of the safe (see Figure A). Push key in and rotate the key 90 degrees clockwise to open the safe.
2) Locate the battery compartment inside the safe beneath the control panel (see Figure B).
3) Remove the battery cover by pressing down on the tab near the top of the cover.
4) Insert the 18650 rechargeable lithium-ion battery (included in accessory box) into the battery compartment. Note that your Vaultek® safe automatically detects the polarity of the battery and can be installed in either direction.
TIP: For easy removal make sure to place the pull string over the battery before closing the door.
5) When the battery is inserted you will hear a short welcome tone and the keypad will light up. Once you hear the tone replace the battery cover. You are now ready to program your safe.
Can I keep my safe plugged in?
Leaving your safe plugged in continually will not harm the safe or battery.
However, to preserve battery life we suggest that you unplug occasionally to allow the battery to cycle down.
Charging Safe
1) To recharge the safe, plug the micro-USB into the micro-USB receiving jack located on the side of the safe and connect to a standard USB port or wall outlet using the AC power adapter. Approximate recharge time is 2.5 hours.
2) The LED next to the receiving jack on the side of the safe will glow RED indicating charging and GREEN indicating charged.
After installing the battery, use the charging kit provided to charge the unit 100%.
Using Powerpack with Wi-Fi Safe
ONLY use VP6000 to charge the installed 18650 battery when the battery is LOW.
Unplug VP6000 immediately when the battery is mostly or fully charged.
CAUTION: Leave VP6000 plugged-in when the battery is fully charged will cause the safe reset to LPM OFF mode (Wi-Fi always ON) thus deplete VP6000 quickly.
Master Code
NMX / NMXi
1) Open the safe. With the safe open, press and hold the ‘1’ key then the “PROGRAM” button together (3 seconds) until the LCD screen prompts you to enter your new code.
2) Enter your NEW master code.
3) Press and hold the ‘1’ key then the “PROGRAM” button together a second time (3 seconds) until the LCD screen prompts you
to re-enter your new code.
4) Enter your NEW master code a second time.
5) Press and hold the ‘1’ key then the “PROGRAM” button together
a third time (3 seconds) until the LCD screen confirms the code change is complete.
If you make a mistake and the new code will not work, simply start over with step 1.
MX / MXI
1) Open the safe. With the safe open, press and hold the ‘1’ key then the “PROGRAM” button together (3 seconds)(Figure D) until the screen prompts you to enter your new code.
2) Enter your NEW master code.
3) Press and hold the ‘1’ key then the “PROGRAM” button together a second time (3 seconds) until the screen prompts you
to reenter your new code.
4) Enter your NEW master code a second time.
5) Press and hold the ‘1’ key then the “PROGRAM” button together
a third time (3 seconds) until the safe beeps and the screen confirms the code has been reset.
If you make a mistake and the new code will not work, simply start over with step 1.
Register Your Safe
Vaultek strongly encourages you to register your safe as soon as receive it. Registration provides many benefits including technical support and ordering replacement keys should you replace them. Your safe has a unique product part number on the inside of the batty door and a 4-digit ID number engraved on the keys. You will need these numbers to register your new unit.
1. Locate your product part number. It is printed on the first page of your user manual and on the back of the battery cover.
2. Find your 4-digit number engraved on the keys.
3. A copy of your receipt or order number.
Get to Know Your Safe
Power
Your safe uses a 3.7V 18650 rechargeable lithium-ion with a flat top. A minimum 2000 mAh capacity is required, however 2200 mAh or higher can be used to increase operation time.
Battery Status
To check the battery level press and hold keys ‘6’ and ‘8’ together for 3 seconds. The screen will indicate the battery level.
Sound (ON by Default)
To toggle the sound ON/OFF press and hold keys ‘1’ and ‘3’ together for 3 seconds. The screen will indicate the sound is ON and beep or the screen will indicate OFF and not beep.
Tamper Detection
To check for tampering press and hold keys ‘2’ and ‘4’ together for 3 seconds. The screen will indicate TAMPERING or CLEARED. You can reset the tamper detection by opening the safe through one of the authorized entry points.
Open Door Alarm
Your safe features an open door alarm that will sound when the safe door is left open for more than 8 minutes. By default, this alarm is ON. To toggle off press and hold keys ‘3’ and ‘5’ and “PROGRAM” together (3 seconds). The screen will indicate ON or OFF.
Alert of Manual Unlock (OFF by Default)
If the Alert of Unlock is on, and someone opens the safe with either the key or by picking the lock, the keypad will start flashing. To toggle Alert Unlock press and hold keys ‘3’ and ‘6’ then “PROGRAM” button together for 3 seconds. The keypad will flash GREEN indicating enabled or RED indicating disabled. If ON and activated it can only be cleared by entering master code.
Travel Mode
Save battery life by disabling the proximity sensor, keypad, and status bar. To toggle travel mode ON/OFF press and hold keys ‘1’ and ‘8’ together for 3 seconds. The screen will indicate ENABLED or DISABLED.
Mounting
Your Vaultek® safe can be secured via the included mounting screws to a flat surface using the pre-drilled holes on the bottom and back of the safe.
TIP: Make sure you have enough clearance for the door to open properly before mounting the safe.
TIP: Remove the covers to access bottom mounting holes.
1) Position the safe on a flat surface where you want to mount it.
2) Use a pencil to mark the holes for drilling.
3) Remove safe and drill pilot holes.
4) Position safe in place and install screws through safe into pilot holes. Tighten screws.

