

Vaultek Support
DS2e Smart Station
DS2e Smart Station
Support Resources
Support Resources
Master Code
You can program a master code between 4 to 8 digits in length. Two keys can not be pressed at the same time. Programing a new code will overwrite your previous code.
Get Started
Basic Overview
The Vaultek® DS2e Smart Station™ is a tough and rugged quick access safe. Its solid structure and penetration resistant design makes it ideal for storing valuables such as firearms, jewelry, cash and other personal items. The safe combines high security with complete access control.
Battery Power Required: This safe runs on two AAA batteries and will provide power for about 9 months.
Plug-in Required: This safe needs to be plugged in continuously for normal function of the front LED clock. You can leave the safe plugged in continuously.
If the power goes out or the safe is unplugged, the front LED clock will turn off to preserve battery life and the batteries will power the safe.
Important! Before entering the master code you need to wake the safe by tapping the touch strip so all the keys light up RED.
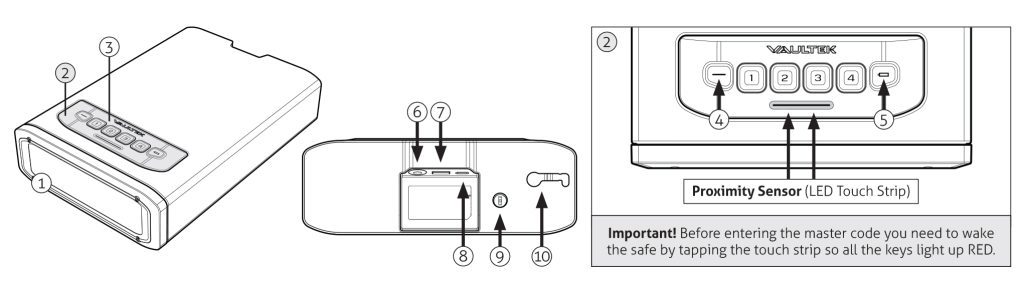
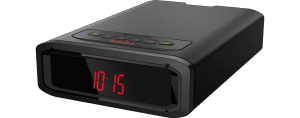
1) LED Clock Display
2) Control Panel
3) Smart Sense™ Keypad
4) Status LED
5) Battery Indicator
6) AC Adapter
7) Standard USB Port
8) USB-C Port
9) Manual Key Entry
10) Steel Cable Release
Important! Your Vaultek safe will atomically lock when you fully close the safe.
Power
DS2e Smart Station runs on two AAA batteries and needs to be plugged in for normal function of the front LED clock. The batteries provide power for about 9 months. If the power goes out or the safe is unplugged, the front LED clock will turn off to preserve battery life and the batteries will power the safe.
Battery Power Required
Two AAA batteries provide battery power for about 9 months. Backup manual keys are included.
If the power goes out or the safe is unplugged, the front LED clock will turn off to preserve battery life and the batteries will power the safe.
1. Purchase two brand new AAA batteries. We recommend using brand name batteries from Duracell/Energizer or other reputable brands.
2. Open the safe.
3. Locate the battery compartment at the back of the safe drawer.
4. Install two AAA batteries.
Plug-In Required
This safe needs to be plugged in continuously for normal function of the front LED clock and two AAA batteries need to be installed. You can leave the safe plugged in continuously.
If the power goes out or the safe is unplugged, the front LED clock will turn off to preserve battery life and the batteries will power the safe.
1. Use the power kit provided to plug the safe into a wall outlet.
Low Battery Warning
The battery indicator will flash RED and sound several rapid beeps. This continues every 5 minutes until the battery dies to indicate the battery is in need of replacement.
Programming Master Code
DS2e Smart Station has an rapid access backlit 4 digit keypad capable of programming a 4 to 8 digit master code.
Before programming lets cover a few code requirements.
- Your code can be a minimum of 4 digits, or a as long as 8 digits.
- Two keys can not be pressed at the same time.
- Programming a new code will overwrite your previous code.
- Default master code is 1-2-3-4 on the keypad.
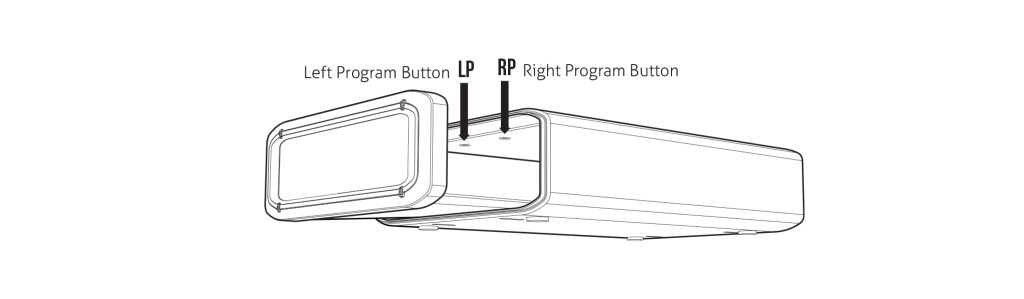
Important! DS2e Smart Station has two separate program buttons inside. One on the left, and one on the right. To set the master code, you will be using the Right Program Button.
1) Open the safe. With the safe open, press and hold the “Right Program Button” (located inside the safe) (3 seconds) until all keys (1-4) light up RED and let go.
2) Enter your NEW master code.
3) Immediately press and hold the “Right Program Button” a second time (3 seconds) until all keys (1-4) light up RED and let go.
4) Enter your NEW master code a second time.
5) Immediately press and hold the “Right Program Button” a third time (3 seconds) until the keypad flashes GREEN and let go. This indicates the master code has been successfully programmed. You can test the code to confirm the change was successful.
Repeat as needed to change master code.
Troubleshooting! If the keys time out during programming you will need to start over with step 1.
Important! Before entering the master code you need to wake the safe by tapping the touch strip so all the keys light up RED.
Having issues? Please email our support team at support@vaulteksafe.com
Master Code Usage Tip!
Before entering the master code you need to wake the safe by tapping the touch strip so all the keys light up RED.
Product Registration
Registration provides many benefits three year warranty, technical support, and ordering replacement keys should you misplace them. Your Vaultek® safe has a unique product number on the inside of the battery door and a 4 to 6 digit ID number engraved on the keys. You will need these numbers to register your safe.
Important! Your safe will automatically lock once you close the lid.
1) Locate your product number. It is printed on the first page of this user manual and under the bottom pad inside the safe drawer.
2) Open the safe using the included backup manual keys.
3) Find your 4 to 6 digit ID number engraved on the keys.
4) Visit https://vaulteksafe.com/support/vaultek-product-registration/ and enter the required information in the form and click submit. Note, your safe is “DS2e Smart Station”.
Having issues? Please email our support team at support@vaulteksafe.com. They would be more than happy to help you out!
Get to Know Your Safe
Access Points
DS2e Smart Station offers rapid access via Smart Sense™ Keypad, and Backup Manual Keys.
Master Code
DS2e Smart Station has a rapid access backlit 4-digit keypad capable of programming a 4 to 8 digit master code.
Before entering the master code you need to wake the safe by tapping the touch strip so all the keys light up RED.
Backup Keys
DS2e Smart Station includes two backup manual keys.
If the power goes out or the safe is unplugged, the built-in backup battery will provide backup power.
Security
DS2e Smart Station features rugged steel construction with anti-impact latches and extended anti-pry reinforcement bars for enhanced security. It includes interior-mounted hinges to eliminate external access points, and can be secured to a stationary object using the included steel security cable or an optional mounting plate sold separately.
Tampering
Tap the touch strip to see if tampering has occurred. If an incorrect keypad entry has been made the status LED will glow RED. You can reset the tamper detection by opening the safe through one of the authorized entry points.
Security Sleep Mode: If six (6) consecutive incorrect keypad entries are made. The safe will not accept any entries for four minutes. If any additional attempts are made the alarm will beep. The Security Sleep Mode can be cleared upon unlock of the safe by any authorized access method including the backup keys.
Security Sleep Mode
Activates when six (6) consecutive incorrect keypad entries are made. The safe will not accept any entries for four minutes. If any additional attempts are made the alarm will beep. The security sleep mode can be cleared upon unlock of the safe by any authorized access method including the backup keys.
Open Door Alarm
The safe will beep and the status LED will flash RED when the safe door is left open for more than 8 minutes. This will continue until the safe door is closed.
Steel Security Cable (Included)
Included is a security cable to attach your safe to larger stationary objects.
1) Loop the security cable around a secured object. Run the end of the cable through the eye of the other end and pull tight around the object.
2) Open safe drawer, and insert the clamped end of the security cable into the rear slot.
3) Slide the cable end all the way to the opposite side.
4) Shut the safe drawer to lock the security cable in place.
Tip! The security cable can only be inserted and removed while the safe drawer is open.
Mounting Plates (Sold Separately)
Your safe can be mounted using a mounting plate (sold separately). There are two available mounting plates.
Desk Mounting Plate
Tip! Make sure you have enough clearance for the safe to open properly before mounting the safe.
1) Position the mounting plate on a flat surface where you want to mount it.
2) Use a pencil to mark the holes for drilling.
3) Drill pilot holes.
4) Position safe in place and install screws through safe into pilot holes. Tighten screws.
Under Desk Mounting Plate
Tip! Make sure you have enough clearance for the safe to open properly before mounting the safe.
1) Position the mounting plate under a flat surface where you want to mount it.
2) Use a pencil to mark the holes for drilling.
3) Drill pilot holes.
4) Position safe in place and install screws through safe into pilot holes. Tighten screws.
Power
DS2e Smart Station runs on two AAA batteries and needs to be plugged in for normal function of the front LED clock. The batteries provide power for about 9 months. If the power goes out or the safe is unplugged, the front LED clock will turn off to preserve battery life and the batteries will power the safe.
Battery Power Required
Two AAA batteries provide battery power for about 9 months. Backup manual keys are included.
If the power goes out or the safe is unplugged, the front LED clock will turn off to preserve battery life and the batteries will power the safe.
1. Purchase two brand new AAA batteries. We recommend using brand name batteries from Duracell/Energizer or other reputable brands.
2. Open the safe.
3. Locate the battery compartment at the back of the safe drawer.
4. Install two AAA batteries.
Plug-In Required
This safe needs to be plugged in continuously for normal function of the front LED clock and two AAA batteries need to be installed. You can leave the safe plugged in continuously.
If the power goes out or the safe is unplugged, the front LED clock will turn off to preserve battery life and the batteries will power the safe.
1. Use the power kit provided to plug the safe into a wall outlet.
Low Battery Warning
The battery indicator will flash RED and sound several rapid beeps. This continues every 5 minutes until the battery dies to indicate the battery is in need of replacement.
LED Indicators
DS2e Smart Station’s capacitive keypad has multiple LEDs built in to provide various feedback. The LED will illuminate as needed when the safe is awake. To wake the safe, tap the touch strip.
Tampering Status
Tap the touch strip to see if tampering has occurred. If an incorrect keypad entry has been made the status LED will glow RED. You can reset the tamper detection by opening the safe through one of the authorized entry points.
Battery Status
Tap the touch strip to see the battery status. The battery indicator will glow GREEN or RED. Green indicates the batteries have sufficient power, and Red indicates the batteries are need of a replacement.
Clock
The clock can be set from the safe using the steps below.
Setting the clock to either 12 hours or 24 hours.
1. First wake the safe by tapping the LED touch strip. Then press and hold keys ‘2’ and ‘4’ together to toggle between a 12 hour standard clock and 24 hour military clock.
Setting the time.
1. Press and hold the “Left Program Button” (located inside the safe) until the status LED flashes GREEN and the hours on the clock start flashing. You can now set the hours.
2. Tap the “Left Program Button” to toggle through the hours.
3. Once you set the right hour wait until the minutes start flashing to begin setting the minutes.
4. Tap the “Left Program Button” to toggle through the minutes.
5. Once you set the right minutes wait until the safe beeps and the clock is solid RED. You have successfully set the clock.
Clock (ON by Default)
The clock is ON by default. To disable, wake the safe first by tapping the LED touch strip. When the safe is awake press and hold keys ‘1’ and ‘4’ together.
Setting the clock to either 12 hours or 24 hours.
Wake the safe by tapping the LED touch strip. Then press and hold keys ‘2’ and ‘4’ together to toggle between a 12 hour standard clock and 24 hour military clock.
Sound (ON by Default)
Toggle between ON or OFF. First wake the safe by tapping the LED touch strip. When the safe is awake press and hold keys ‘1’ and ‘3’ together. The status LED will flash RED indicating OFF or GREEN indicating ON.
Factory Reset
The Factory Reset erases all programmed information and restores the safe to its default settings. This includes resetting the master code to 1-2-3-4. Before you perform a Factory Reset make sure the safe is plugged in. To perform a factory reset, press and hold “Left Program Button” and “Right Program Button” together until the keypad flashes GREEN and the safe restarts.
Troubleshooting
Keypad is Not Responding
Before entering the master code you need to wake the safe by tapping the touch strip so all the keys light up RED.
Setting the Display Clock
The clock can be set from the safe using the steps below.
Setting the clock to either 12 hours or 24 hours.
1. First wake the safe by tapping the LED touch strip. Then press and hold keys ‘2’ and ‘4’ together to toggle between a 12 hour standard clock and 24 hour military clock.
Setting the time.
1. Press and hold the “Left Program Button” (located inside the safe) until the status LED flashes GREEN and the hours on the clock start flashing. You can now set the hours.
2. Tap the “Left Program Button” to toggle through the hours.
3. Once you set the right hour wait until the minutes start flashing to begin setting the minutes.
4. Tap the “Left Program Button” to toggle through the minutes.
5. Once you set the right minutes wait until the safe beeps and the clock is solid RED. You have successfully set the clock.
Lost My Keys
To order a set of keys, charging kit, or steel cable, fill out our Spare Parts form.
Having issues? Please email our support team at support@vaulteksafe.com.
Downloads
Manual
The following digital product manuals are available for use.
Fitment Template
Simply print the template on an 8.5″ x 11″ sheet of paper and place your valuables on the template to see if they fit. When printing, do not scale to fit, instead print at 100%.